Showing posts with label How To. Show all posts

What is timelapse?

| Saturday, March 30, 2013

Time-lapse photography is a technique whereby the frequency at which film frames are captured (the frame rate) is much lower than that used to view the sequence. When played at normal speed, time appears to be moving faster and thus lapsing. For example, an image of a scene may be captured once every second, then played back at 30 frames per second. The result is an apparent 30-times speed increase. Time-lapse photography can be considered the opposite of high speed photography or slow motion.

;


Processes that would normally appear subtle to the human eye, e.g. the motion of the sun and stars in the sky, become very pronounced. Time-lapse is the extreme version of the cinematography technique of undercranking, and can be confused with stop motion animation.


Read more »

How to create Timelapse

|
Tutorial on how to create timelapse. What is timelapse? Please click this.


11 Steps to create Timelapse.

1) Set-up your shot
2) Take a test shot
3) Adjust the camera settings
4) Take another test shot
5) Calculate the timelapse
6) Setup your intervalometer
7) Set them together
8) Stand by the camera
9) Monitor
10) Compile the video
11) Publish the video


1) Set-up your shot. Use a tripod or location to place your camera. I prefer to use tripod. A good quality one, the cheap crappy tripod sometime can't hold the camera in position especially if the camera is heavy.

2) Test shot. Take a test shot of the area. Frame and compose the area you wanted nicely.

3) Adjust the camera settings. Switch the camera into your preferred mode. Use your test shots exposure information to set the aperture. If you use the shutterspeed mode, set it to your desired value. If you use the aperture mode, set it to your desired value.

4) Take another test shot. Only do this if you have easy access to the viewfinder, and use a remote to avoid camera shake. This shot is just to make sure the images are properly exposed using the manual settings.

5) Calculate the timelapse. You have to plan on how long the timelapse video will be play. You can download Android and iOS app to do the calculation easier.

6) Setup your intervalometer. I used a Nikon D3 that already have built-in interval timer shooting. If your camera don't have this built-in feature. The intervalometer is the solution.

Intervalometers

Intervalometers (some call it remote control) is a device, an add-on that usually doesn’t come with your dslr. what it does is it allows you to set your DSLR to hit the shutter button at the interval your prefer, e,g., every 1 second, every 10 second or every 1 minute.


Intervalometers

Intervalometers is almost essential because it helps you to push the shutter automatically. It also helps you to avoid blurry photo when you push the shutter manually. Intervalometers varies from brands and you can get it around $55 – $75. These are some intervalometers for famous camera brands (if your camer don't have interval timer shooting).

NikonCanonSony / MinoltaOlympus


Some camera have a built-in feature for time interval shooting.

7) Set them together. Hook up your calculator (or intervalometer) to your camera and press start.

8) Stand by the camera. Waiting process is the real challenge to create timelapse. Monitor the battery level and number of photos left in memory card. You might need to change the battery or replace a fresh memory card.

9) Monitor. Always check on the photos taken once in a while. If you are doing timelapse of both day and night. Make sure you increase/decrease the ISO accordingly so you will get perfect exposure photos.

10) Compile the video. There are several  software to compile the photos and transform it into timelapse.

11) Publish the video. Youtube always the number one choice to publish your timelapse. But there are always Vimeo and Flickr as another solution.
Read more »

Card Speed : SD, SDHC and CF Card

| Monday, March 25, 2013

This is an SD, SDHC, CF card transfer speed to MegaBytes per second chart:
Secure Digital (SD)

Secure Digital High Capacity (SDHC)
Compact Flash (CF)


1000x = 150MB/s
 966x = 145MB/s
 933x = 140MB/s
 900x = 135MB/s
 866x = 130MB/s
 833x =  125MB/s
 800x = 120MB/s
 766x = 115MB/s
 733x = 110MB/s
 700x = 105MB/s
 666x = 100MB/s
 633x =  95MB/s
 600x =  90MB/s
 566x =  85MB/s
 533x =  80MB/s
 500x =  75MB/s
 466x =  70MB/s
 433x =  65MB/s
 400x =  60MB/s
 366x =  55MB/s
 333x =  50MB/s
 300x =  45MB/s
 266x =  40MB/s
 233x =  35MB/s
 200x =  30MB/s
 166x =  25MB/s
 150x =  22.5MB/s
 133x =  20MB/s
 100x =  15MB/s
  66x  = 10MB/s (SD speed class 10)
  40x  = 06MB/s (SD speed class 6)
  26x  =  04MB/s (SD speed class 4)
  13x  =  02MB/s (SD speed class 2)
The speed of the card is either specified in “x” transfer speed ratings (300x) or in MB per second (45MB/s). This is based off the system used for the original CDROMs, which is 150 KB/s. For our purposes, this can better be read as 0.15MB/s, since 1,000 kilobytes = 1 Megabyte (150 kB/s = 0.15 MB/s). So:
“x” transfer rate x 0.15MB/s = speed rating in MB/s.
Thus, 300x transfer speed rating would be: 300 * 0.15 MB/s = 45 MB/s
Manufacturers rate the speeds of their cards (not a governing agency), so actual transfer speeds can, and will, vary. Some manufacturers rate speeds by read access, others by write access.
Read more »

DIY : How to upload photo files to internet without computer

| Monday, January 7, 2013
Today's guest post by GfK from Patras, Greece will show you how to share RAW/JPG files with an Android phone:

Except the Nikon D4 that has Ethernet connection and Nikon D3200 that is compatible with a WiFi transmitter, I am not aware of a DSLR that can share images directly on the Net. Here's a description on how one can download the images to the mobile phone and share them instantly (or later) on the Internet.

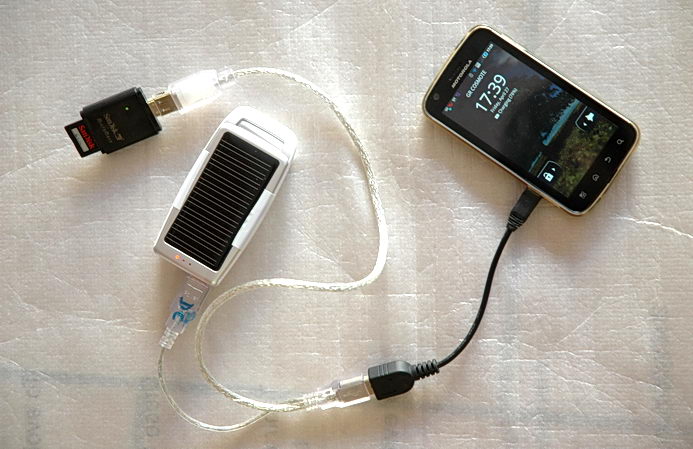
All you need is a card readerAndroid phoneUSB On-the-Go cable (the black cable in the images), USB Y-splitter cable (those that come with some external hard drives so they provide more amperes at their input) and USB battery charger.

 DIY: How to upload your RAW/JPG files to the Internet without a computer (guest post)


Connectivity
Most smartphones and tablets have microUSB port for connecting peripherals. By using a USB-OtG cable and if a suitable drivers exist (Android OS is based on Linux, it has embedded drivers for USB storage devices and for other peripherals as well) one can read the contents of a flash drive or a SD/CF/MS card.

The problem is that mobile phones don't provide current at their microUSB port. With Y-splitter or other ways (check here) we can provide +5V simultaneous power to the flash drive and to the microUSB port of the phone. To check if everything is connected, make sure the phone is charging and the lamp of the flash drive/card reader is on. In my setup the current is provided by USB solar battery charger (around $15 on eBay), but if you're in the office you can use a PC USB port.

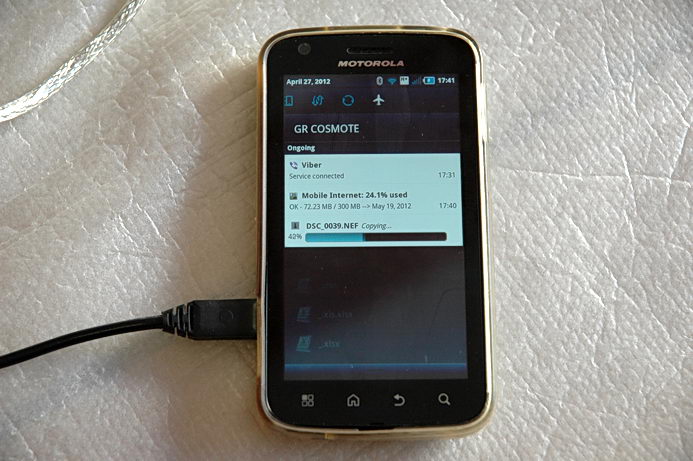
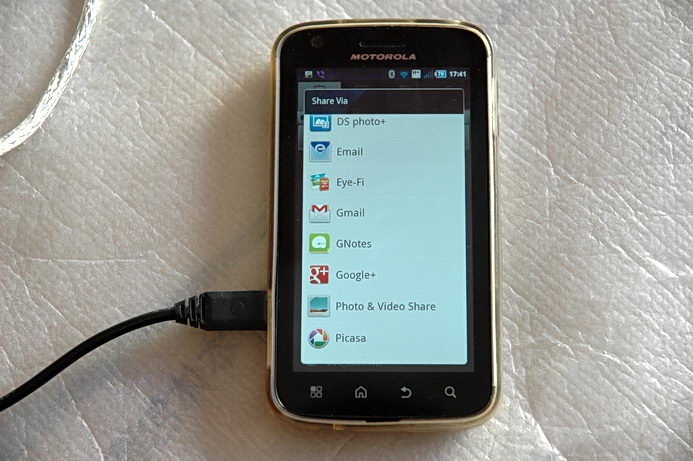
Using the mobile phone's file manager, navigate to the flash drive (usually at /mnt/usb, if you need to mount it read this link). Convert the RAW into JPG in the camera or in the phone and share the image on the Internet via 3G:

 DIY: How to upload your RAW/JPG files to the Internet without a computer (guest post)

 DIY: How to upload your RAW/JPG files to the Internet without a computer (guest post)

 DIY: How to upload your RAW/JPG files to the Internet without a computer (guest post)

That's all. Now if somebody ask you to instantly upload a photo, you have a solution. Of course there are also the Eye-Fi memory cards, but they are expensive and it's rather unlikely that all of our cards are of that kind. Eye-Fi cards are however tested and reliable.
Read more »

GET VOUCHER FOR BLOGGING!!

| Thursday, February 9, 2012


What are you waiting for? Blog now!

Have question? Drop your questions at KameraMin.

Read more »

Nikon : DSLR Tutorial

| Thursday, August 11, 2011
I would like to share a Nikon website. This website contain online tutorial about basic to amateur DSLR photography. I browse through all the contains, and I find it to be so much information and useful.

At KameraMin, we always bump into questions regarding DSLR, how to, tips and thing that is related to DSLR photography. And we would like to apologise for those who always ask us because we don't have the time to explain in great detail even though we love to share our knowledge. (Normally, people would ask us at wedding reception, or solemnization ceremony which we are on duty during that time)

I think this is a very good idea. Rather than just selling cameras, Nikon made online tutorial. It helps a lot for newbies and amateur.


See amazing photos by KameraMin using these tutorials. enjoy them all. Currently for DSLR market, these models are still available today (still producing) Nikon D3100, Nikon D5100, Nikon D300s, Nikon D700, Nikon D3

Besides Nikon, all other DSLR users such as Canon, Pentax, Olympus, Sony, Samsung, Panasonic, Leica, Hasselblad, Konica, Fujiflim can also use this online tutorial.

P/S : share this with others okay. 
Read more »

ON AIR! Wedding Farah AF + Johan

| Tuesday, July 19, 2011


Still talking about Johan + Farah AF wedding.. Thank goodness we got several media coverage such as newspapers, magazine and including online TV. ON AIR!


Here is the video. See.. As I told you, even after 13 hours non-stop shooting for the reception event starting from detail shots, make up, reception until the end. Still energetic. Why? Because I really love wedding photography and I truly enjoy shooting the weeding events. 3 Days in a row, was full of enjoyment for me. A treat for me, and challenging my skills
Tips : the only way to give the best for wedding photography is to love wedding all your heart. no excuse allowed

And for the question.. Why Ceritera Cinta? Not KameraMin..? You have to understand this..

KameraMin is the brand

Ceritera Cinta is one of our products (for wedding photography). Other than this, we have ConvoPhotoshoot (for graduation day), BabyBubu (for newborn photography) and WhiteStudio (for studio photography). So, I hope everyone will understand this.. :)

P/S : The next day I slept 10 hours. Hehe. A very quality sleep after a long 3 days.
Read more »

FREE Event Photography Course

| Wednesday, June 1, 2011


The event will be conducted somewhere in June 2011.
THREE candidates will be teach by professional event photographers.


Subject that will be teach during the event photography course:


1) Ethics and professionalism
2) Gear and equipments
3) Journalism in event photography (corporate, concert, etc)
4) Training session and critics


Requirements

1) Camera Body (any brands will do)
2) Telephoto lens (eg : 18-55, 55-200)
3) Speedlite
3) Discipline, will obey rules and regulations
4) Professional looking in appearence
5) Can work as a team and support other members
6) Will be available for 3 days (8 hours/day) events from 1-3 July 2011 at Stadium Melawati, Shah Alam
7) Course will be conducted in ONE day from 9.00 am to 4.00 pm (planning on doing this on weekdays)
8) Course will be conducted in Shah Alam or Solaris Dutamas


Value of course is MYR495 but we are giving it for FREE!!
The exact informations of date, time and venue will be disclose to succesfull candidates


for inquiries please contact
kameramin@live.com
+60176943437
Read more »

Win FREE Nikkor Lens

| Tuesday, May 31, 2011
I got this lens which I want to give out for FREE to anyone who's interested in it. I want to make it much more fun so I decided to make an open competition about it.

1x Nikkor 70-300 f4.5-5.6
1x Hood
1x Front cap
1x Rear cap
1x UV Filter 62mm

The picture are not the actual photo of the lens. I don't have the chance to snap the photo of the actual lens. The lens is used and the current condition of the lens is 8/10. The  body is tearing off and have scratches. But it works perfectly well with no dust or scrath on the lens.

How to get it?

Please follow these step by step guideline.

1) Blog about KameraMin and tell stories about our wedding photography, and also tell us why you like our photography? Send us the link for your post (in this comment section, on your fb and KameraMin fb as well). You can put as many entries as you like. No limitation.
2) The names of final 3 candidates will be announce after ONE week of this competition ended. The judges decisions are final.
3) 1-on-1 training with the principal photographer. 3 days wedding job as assistant.
4) ONE winner will be choose among those 3 candidates after all of them finishes the evaluation as assistant photographer.


Terms and Conditions

1) The competition ends 31st July 2011.
2) Assisting job will begin around 1st August 2011 onward. KameraMin will give out information on the date, time and location of the wedding photography. (We ask you, if your are available, you join, if not, it's okay, we will offer some other time).
3) Only the best performer will be grant the winning prize.
4) Wedding and portrait photography enthusiasts are most welcome.
5) Willing to learn new things in photography. KameraMin style!
6) KameraMin will offer permanent assistant job in future (will be paid according to skill and level)


There are nothing to lose. If you don't win the competition. you get a hell of experience with KameraMin photographer and learn our style in photography. (Worth MYR 300-500 going on wedding photography course). Goodluck everyone!!


Read more »

Ray of Light

| Monday, May 30, 2011


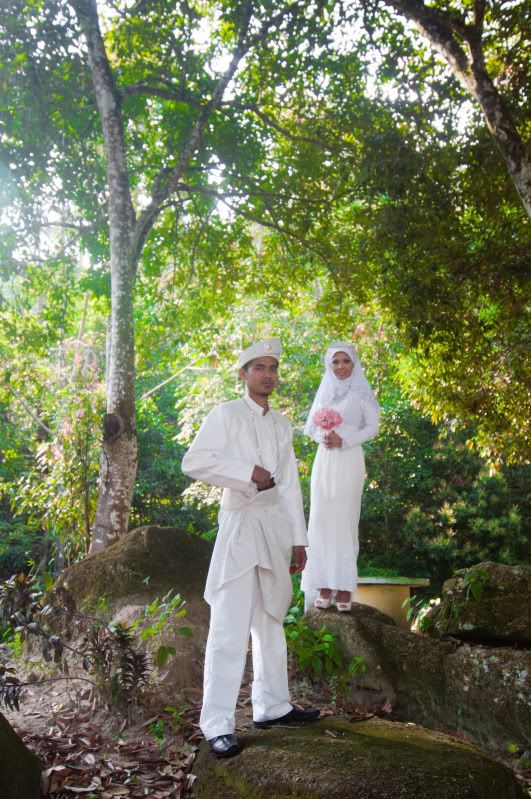
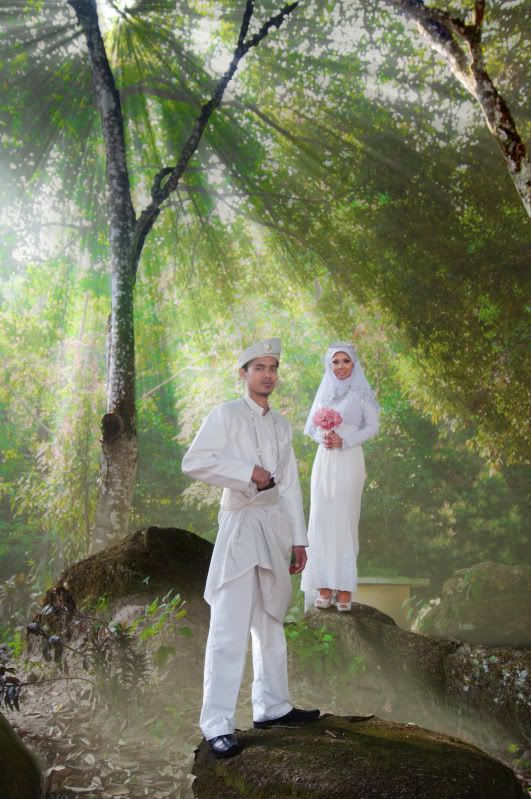
Today, I would like to talk about editing. There are many styles in editing. There are photo manipulation, super impose and many others. But I am interested in realistic editing which means I wanted the photos to look much more realistic and the editing that I am referring to is known as Ray Of Light (ROL). This editing is suitable for wedding and portrait photography because it enhance the quality of photo without inserting fake object or graphic elements. To do this kind of editing there are 2 elements involved.

The first one is the photographic element
and
the second one is the editing element

For the first part, the photographer must find situation where the lights are intense with a very dark shadows on the ground or the surrounding. This will ensure that the picture are genuinely having ray of light. Most of the time, fake ROL can easily be notified at once as the situation and direction of the light are inconsistent.

Photobucket

Tips : to find ROL, it is much better when the sunlight (for natural ROL) between 1200-1500. During this period, the sun is most likely positioned on top of the head. And the intensity are high. another thing is to find the ROL in between tall huge trees, in between buildings.. this are my guideline, it should give you some idea on capturing ROL photos.

For the second part the editing. I will not explain every detail of the process as it was not my attention to do. Showing this photos might give you a new idea on improving your editing. So, you'll find somebody to teach you in details, honestly because the workflow are almost 10-20 layers not including the simple basic editing (cut, dodge, etc)
Photobucket
Photobucket
Photobucket
Photobucket
Photobucket

Photobucket

Photobucket

Photobucket

Photobucket

Tips : To do this editing, one have to be at advance level of Photoshop editing. A beginner level will not have sufficient knowledge on this kind of editing. This kind of editing involve with feather, threshold, level layers and white balance most of the time..


So, this is the final products. Quite impressive isn't it. Now the ROL and all the details are very much clearer. And our eyes have a much better focus when looking into photos like this.
Photobucket

If anyone wishing to improve their editing. You have to really spend a lot of time for this kind of editing. Even for me, it took me more than a month to really master this ROL editing before I dare publish this photos. The best advice that I can give is to do hundreds of practice both in photography and editing. Like we always hear, Practice make perfect. So, start practicing now!
Read more »

Behind the scene..

| Sunday, April 10, 2011
Last saturday, 9th April 2011. I went for a photoshoot for an engagement ceremony in Shah Alam. The place was wasy to find, it appears on the google map instantly. While busy taking photos, one of the guest snap couple photos of me. *like*

These photos are courtesy of Azri Naim. He is one of many guests in the engagement ceremony of Ali Reza + Farhana.


"Kesian fotografer takde gambar sendiri"
"Pity on the photographer, not to have his own photo"

Yup, that's too bad. But it's nature of the job. Anyway, thanks a lot to Azri Naim for these photos. I appreciate it so much. That's why I made a blog entry out of it.
Read more »

Clutter Background

| Wednesday, April 6, 2011
For a good photo, having a clear background is essential. It has been a guideline for me when I am shooting. But sometime, the are just things that you cannot remove during the photoshoot such as big trees, building structures and more. Just take a look at the photo below.


Look like everything is okay rite. But actually there are several thing that without them, the photo will look much better..

here are the things that i wish to go away.


Hours and hours of editing for one perfect photo.. and this is what i get.. the photo that i wish to shoot..


worth every seconds of time pent on editing. :) this after editing photo, put a big smile on my face today. hopefully, the client will also feel the same way.
Read more »

Royal Event

| Monday, April 4, 2011


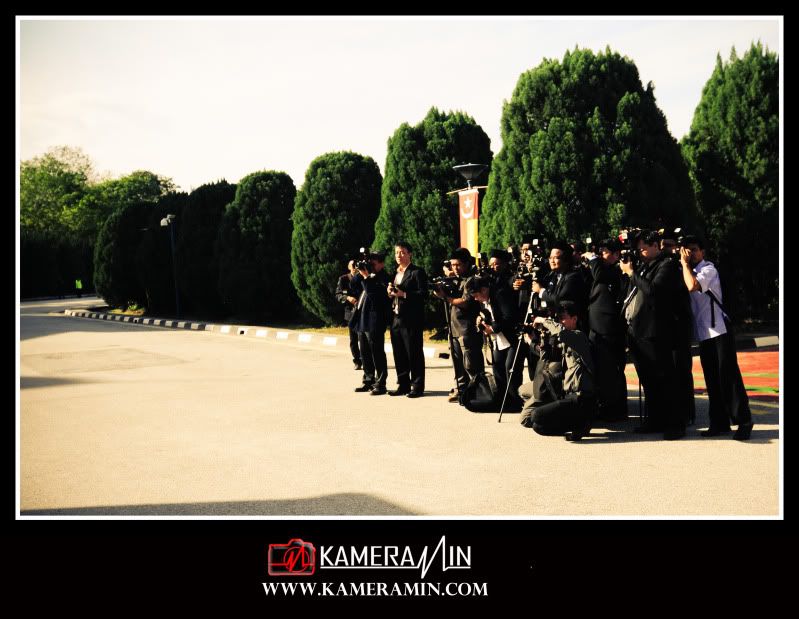
There are a huge different when we are taking photos for normal corporate event and event that involve royalty.These are the main things to be consider for royalty event.


1. Attire

Dark colot coat (preferebly black), black tie with no pattern, white long sleeve shirt and also songkok. In this case, Sultan Selangor doesn't restricted the songkok to non-Malay. But for Sultan johor, songkok is a must.


2. Attitude

You have to behave in front of the Sultan, for certain part especially group photos, the subject must ask for Sultan's permission to take the photos.. Just a simple 
"Tuanku, patik akan ambil 5 keping gambar Tuanku. Terima kasih tuanku"..

Never walk cross in front of the royalty. It can be consider rude.


3. Protocol

In formal event, protocol is the key. Please be prepare with the protocol and event schedule. Because during event, knowing the flow of the event will help you manage your movement and be prepare at the main event venue.

Photobucket

4. Make friend

Event such this will lure many photographers, royal photographers, press, event official photographers.. Lots and lots of photographer.. Making friends with them might give you an advantage.


5. No flash

In certain area, the usage of flash is prohibited. The main Dewan Selangor hall is one of the place you cannot use flash at all. Don't try to act superior and use flash, otherwise the official guards will have no hesitation to kick you out of the building.


After all of the tips, it will all be a good experience to shoot royalty event. I had a lot of fun and enjoy my time shooting for this event.
Read more »

How to choose GOOD DSLR?

| Monday, November 15, 2010


How to choose a good DSLR?
First of all, there's no such thing as one size fits all.. So, each person have to find their own suitable DSLR, according to what they prefer.. In my opinion, it all depends on few things. Budget, Usage, Popularity


Budget
What ever you buy please consider your budget. The best thing to do is buy DSLR that really really worth every dolar you spend. Do researches about the brands, models, and price of your desired DSLR. You MUST compare the price of DSLR that you found. When you are at the shopping mall go to as many camera shops you can find and compare the prices of camera. Then you can decide which one is the best (worth for money). 
You can also consider buying 2nd hand DSLR and its accessories with a highly caution. I bought mine here at KameraMin ShopFTZ, Mudah, LowYat, PhotoMalaysia, Photoskool


Usage

What do you use you DSLR for? For hobby, taking pictures of family and landscape?
Bear in mind that DSLR have many range from beginner up until professional level.
What is the different between beginner / entry level DSLR, semi-pro DSLR and professional level DSLR?
When you know what type of photography you will use your DSLR for, then you can narrow the range of DSLR that you should choose before buying.


Popularity
By popularity, what I mean is that when the camera is popularly use, it become much easier for you to find shops that sell the same DSLR. It made it easier to find accessories, gadgets and lenses. And most importantly, a very popular brand DSLR will surely have many user. Thus, you can communicate and learn to use your DSLR with them. In business, if there are many sellers who sell the same thing, it will create business rivals. So, the shopkeepers will fight for the best price to attract customers. This is an advantage for popular brand DSLR.


The Best Time To Buy
The best time to buy a camera is in the weekdays on the middle of the month. This is because, this two combinations are the time where shops are making less sales. So, basically they will be giving out more freebies and more discount to make you buy the camera. 


Just imagine this situations.
Situation (1)
End of month (most people got their salary)
The camera shops will be cram up with a lot of people who wants to get their DSLR, this will make the shop owner feel that they don't need to give discount and more freebies. 
"If you don't wanna buy, I have more people who wanted to buy it for this price RMXXXX"
It's a disadvantage for you.


Situation (2)
Weekends / holiday
During weekend/holiday, surely more people will come out for shopping compare to weekdays. In this situation, its almost the same like situation (1) where the camera shops will be cram up with a lot of people who wants to get their DSLR, this will make the shop owner feel that they don't need to give discount and more freebies.
"On weekend/holiday, my sales are pretty good because there are many customers. Why should I give you discount"
This is what they have in mind.
Another disadvantage for you.


So, buy your DSLR camera at the time where camera shops are making less sales and having less customers. Put them (camera shops) in desperation where they are the one who will give out more discounts and more freebies just to get you to buy their camera.


 The idea is to buy when the shopping mall is like this


Don't buy when the shopping mall is like this


Use these tips to buy your camera okay. Hope you get the best price!!
Read more »
 

Copyright © 2008 KameraMin Blog | Design by Muhaimin